Have you ever wondered what goes into designing a book cover? It’s not as simple as just slapping on a pretty picture and calling it a day. In fact, a lot of research and thought goes into creating a book cover that will not only catch someone’s eye but also accurately represent the story within.
When creating the cover for my book, I drew inspiration from beloved children’s books like the Mr. Men series by Roger Hargreaves and The Tiger Who Came to Tea by Judith Kerr. I loved the simplicity of their covers, with the main character front and centre against a plain white background. This style allowed the characters to shine and capture their personality in a fun and playful way.
For my own character, Frankie, I wanted to convey his energetic spirit, so I decided to have him jump out of the water to say hello. It perfectly represented his personality and added a dynamic element to the cover.

Step 1
Research
Before settling on this design, I did a lot of research. I scoured through lists of books and picked out ones that stood out to me. I also looked on Amazon and found books that were number one in a similar category to mine and analysed their covers.
Method
I will be sharing my personal approach to understanding what makes a book appealing. By breaking down certain aspects of a book’s cover design, we can gain insights into the story and the intended audience.
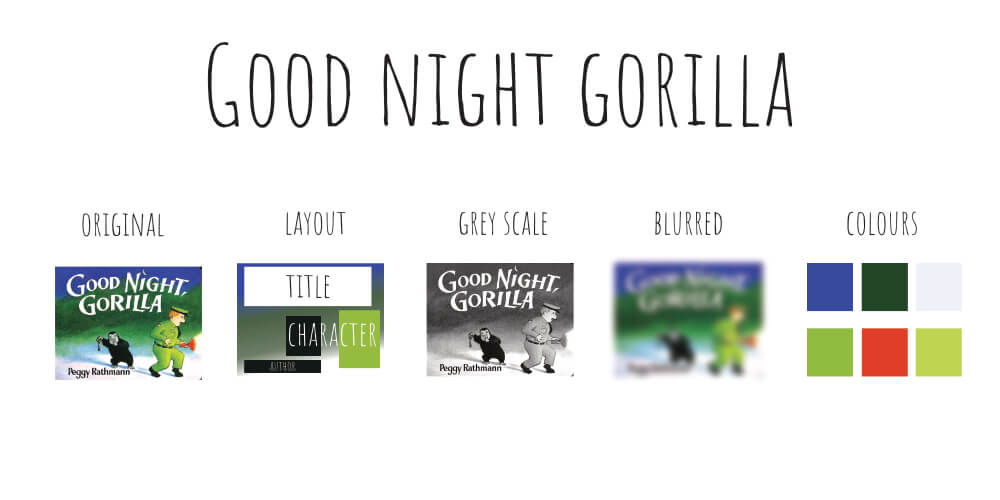
First, I examine the placement and layout of the cover design. I consider the position of the characters, their size in relation to the book, and the color scheme used. Additionally, I ask myself questions such as whether all the main characters are featured on the cover, and what scene is being depicted. I also apply similar questions to the book’s title (size, position, color, typeface).
Next, I analyze the image in grayscale to identify areas of high contrast, which usually indicates where the eye is being drawn to. This helps me better understand the hierarchy of the visual elements on the cover. I also use a blurred version of the image to focus on the big shapes and remove smaller details (for a simpler method try squinting at the image).

To illustrate this approach, I’ll use the example of “The Gruffalo”. When examining the cover design in grayscale, I notice that the title is the point of highest contrast, with the characters blending into the background. In the blurred version, however, the Gruffalo character and the yellow path where the mouse is standing are the points of high contrast.
Finally, I look at the colour scheme used on the cover, taking samples from the most obvious colours present. By doing so, I can quickly determine the overall mood and setting of the story. For example, the lack of red and oranges on “The Gruffalo” cover gives me the impression that it is a friendly book set in nature, and not too scary for young children.
I have included a few more books below, I would like you to take a look and see what information you get from them.


Part 2
Design
Once you have gathered all the necessary information, it’s time to move on to the design phase. There are a variety of software options available for designing your book cover, including popular tools such as Adobe Illustrator, Affinity Designer, and Canva. However, it’s worth noting that some software options like Gimp or Photoshop, which are primarily for photo editing, may not be the best choice for creating a professional book cover.
In my opinion, Affinity Designer is a top recommendation as it offers all the essential tools needed to create a stunning book cover (and interior, too). As you begin designing your book cover, there are two primary elements to focus on: custom art and typography. Take your time and scour Google fonts for the perfect typeface for your books, There is plenty to choose from so you will be sure to find the perfect one.
To create a standout cover, it’s important to ensure that your custom art conveys the essence of your character or story and that the typography complements the art style.
While it’s possible to reuse art from within your book, make sure that the image aligns with the message and tone of your story. In summary, with the right design software and attention to art and typography, you can create a striking book cover that draws readers in and accurately represents your book’s content.
Rough designs
Designing rough drafts is a crucial step in the overall design process. By creating initial sketches, you can explore a variety of different ideas in a short amount of time, which can save you time and effort in the long run. It’s an effective way to avoid investing a lot of time in creating detailed designs that may not meet your needs.
You can create rough designs using a simple pencil and paper or with design software, depending on your preference. In either case, the goal is to create a basic outline of your design idea.
To illustrate the importance of rough drafts in the design process, take a look at this example of a rough draft I created for my picture book ‘Pet Sitter Wanted.’ As you can see, the design is very basic, but it effectively captures the essence of the story. With rough drafts, you can quickly experiment with different design ideas and refine your concepts before investing significant time and resources into a final product.

Final design
After completing your initial design drafts, it’s important to take a step back and analyze your work. Look for any areas of the design that may not be cohesive, such as contrasting colours or conflicting layouts. If you’re satisfied with your drafts, great! It’s time to move on to creating an almost-finished cover.
To begin, download the measurements from KDP and use them to ensure your cover is correctly sized. Then, add your custom artwork and carefully select the perfect typeface for your book title. This process may take some time, but it’s worth investing the effort to create a visually striking and professional-looking book cover.
Before finalizing your cover design, there is one more important step to consider. Place your book cover alongside other books in your genre or category and analyze how it looks. Does it stand out from the competition? Is it visually appealing? Does it accurately represent your book’s content?
By taking these additional steps, you can fine-tune your design and create a book cover that is both visually striking and effective in capturing potential readers’ attention. Once you’re happy with the final design, it’s time to publish your book and share it with the world.

Did you spot it?
In conclusion, creating a book cover can be a challenging yet rewarding process. With the right tools, attention to detail, and creativity, anyone can design a professional and visually appealing book cover. So, if you’re embarking on this journey, we wish you the best of luck in crafting a cover that accurately represents your book’s content and captivates readers. Remember to have fun and experiment with different design concepts until you find the perfect fit. Here’s to a successful and visually stunning book cover!